Blog
Using a Smartphone Telephoto Camera as a Stand-in for Telecentric Optics to Measure a Taper
Couldn't afford a telecentric lens. Instead, I used the telephoto camera on the phone in my pocket, backing away to suppress perspective error and approximate a parallel projection, and measured a taper angle.
Problem
To measure an angular dimension like a taper angle optically, what you really want is a parallel projection, i.e. telecentric optics. With an ordinary central-projection lens, the apparent angle shifts depending on where the object sits along the depth axis. But industrial telecentric lenses are expensive, and not something you can buy for every one-off verification. What I had on hand was the smartphone I use every day.
If you only want the conclusion, jump to Takeaway.
There’s a prequel to this: an earlier attempt to measure the same taper with a 3D scan failed first, which I wrote up separately.
Idea
If you use a telephoto lens and increase the shooting distance, the subtended angle from the lens center shrinks, and even a central projection starts to look like a parallel one. When the shooting distance is much larger than the depth offset of the object, the perspective error angle
falls off in this first-order approximation. Earn more and shrinks. With an iPhone telephoto camera (3x optical, cropped to an effective 15x), you can push in that direction with nothing but the hardware already in your pocket. The idea is to substitute distance for part of what a telecentric lens would buy you.
Method
The actual setup: I photographed the object several times with the iPhone telephoto camera (3x optical, cropped to roughly 15x), then used a self-built manual assist tool (Taper Manual Assist) to hand-place two points on each edge of the tapered faces (A1/A2, B1/B2) and computed the included angle from them. I took multiple shots (four) under identical conditions to check repeatability.
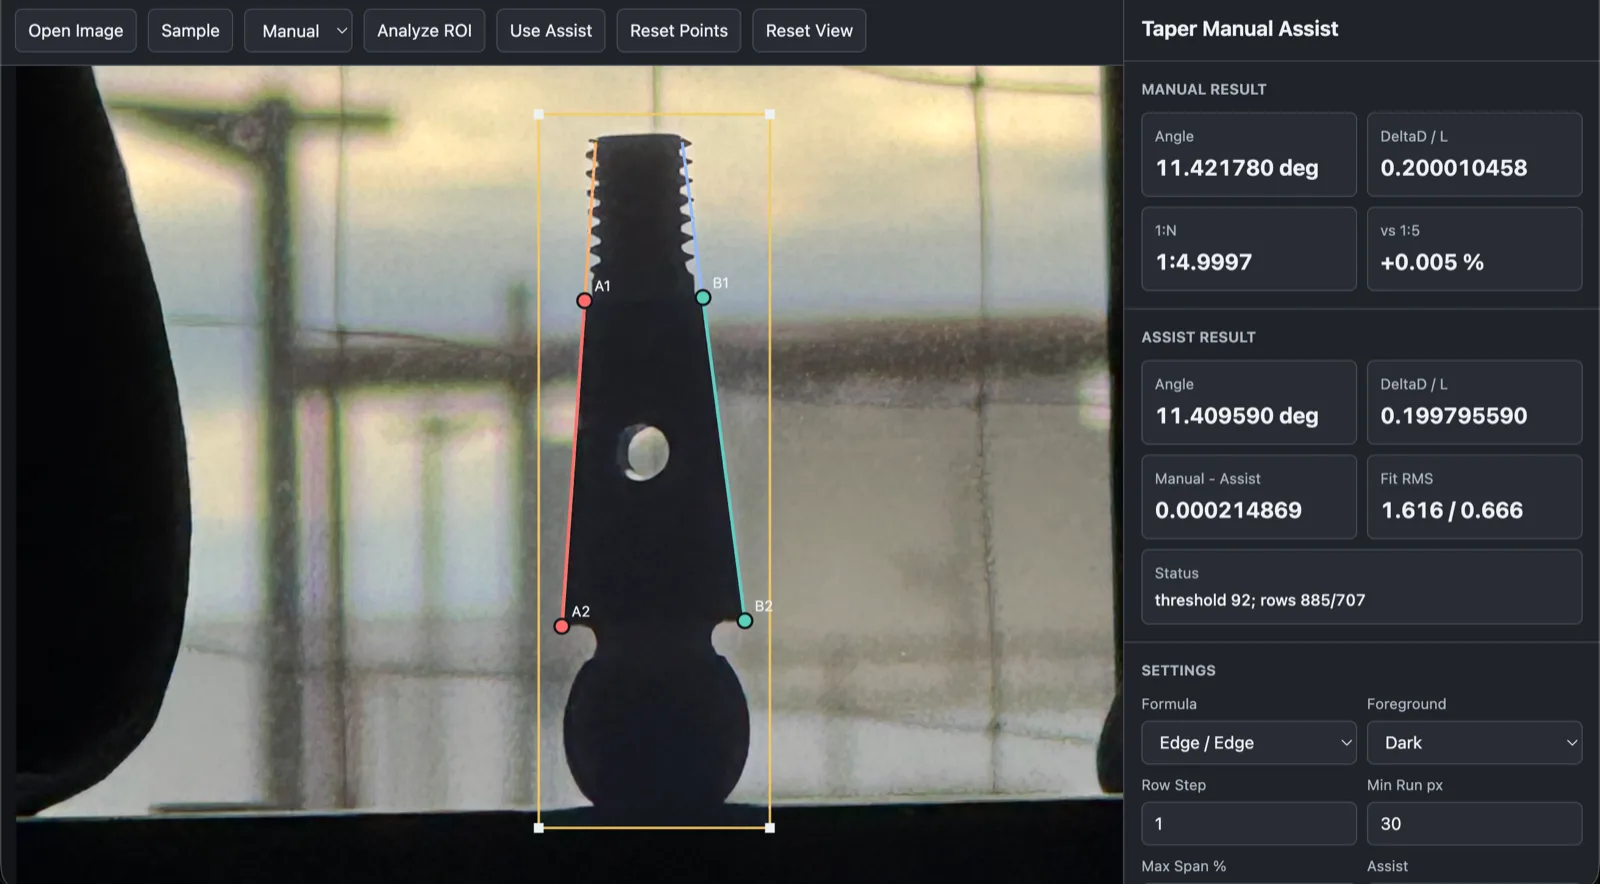
The assist tool is published as a single-file open-source project (MIT).
bakemocho/taper-manual-assist A single-file, browser-only tool for manually measuring taper angle, with an optional edge-fit assist.The shooting location was my one-room apartment. The object stood vertically on the near side of a desk by the window, and I shot handheld from around the center of the room. The shooting distance was roughly 2 meters. Note that this distance and the way the object was held are reconstructed from memory; there is no measurement log or EXIF backing for them. No tripod or fixture, both hands on the phone. I selected the highest-magnification lens on the iPhone and zoomed until the object filled the frame, which is what the “3x optical + crop to 15x” setting corresponds to.
Note that this measurement needs no absolute scale calibration (no mapping to a known dimension). The included angle is computed as the angle between two lines in pixel coordinates, and the taper ratio is a dimensionless quantity derived from the angle alone, so how many millimeters one pixel covers has no effect on the result. What the method does assume is square pixels and that both tapered edges lie roughly in a single plane perpendicular to the optical axis; these assumptions are recorded as measurement conditions in the export data.
Results
The four shots under identical conditions aggregate as follows.
- Mean included angle over 4 shots: 11.543895 deg (min 11.454754 deg, max 11.745134 deg, sample standard deviation 0.135080 deg)
- Mean taper ratio () over 4 shots: 0.202164 (1:N mean 1:4.947)
- Cluster of the 3 shots nearest the median: mean included angle 11.476816 deg, standard deviation 0.019280 deg, 1:N 1:4.976
- One of the four shots came in at 11.745134 deg, outside the cluster; it is treated as a repeatability warning (not blindly averaged in)
Separately, a re-measurement pass using four manual-assist JSON exports gave a stable-core average of 11.421380 deg included angle, ratio 0.200003, 1:N 1:4.999915 (remarkably close to 1:5). That pass, too, extracted 2 of 4 points as the “stable core”, with the other two recorded individually as high-side and low-side repeatability warnings.
Every measurement pass lands near the nominal 1:5 taper (included angle 11.421186 deg, ratio 0.2). I think the honest way to present this is as shot-to-shot scatter rather than as a single decisive number.
Sanity Checks
Published lens specs and the shooting conditions let us verify after the fact why this measurement worked.
Perspective error estimate. Plugging into from the Idea section: an edge-plane offset of gives 0.057 deg, and even gives only 0.143 deg. As long as the object stood vertical with its faces aligned within a few millimeters, perspective error stays at or below the measured scatter (0.135 deg).
The payoff of distance. With the same , a close-range wide shot () would give 0.382 deg. Backing off to 2 m cuts perspective error by roughly a factor of 7. That ratio is exactly the gain behind “use telephoto, buy distance”.
Where the scatter comes from. The included angle is computed from the directions of two line segments about 377 px long, so a manual point-placement jitter of perturbs the angle by rad. That is 0.15 deg at and 0.30 deg at . The measured 4-shot standard deviation of 0.135 deg is explained almost exactly by half-pixel placement jitter. In other words, the dominant error source here is not the optics but manual point-placement precision, which is precisely why edge-fit assistance helps.
Depth of field and diffraction. The shots used the iPhone 15 Pro telephoto camera, nominally 77 mm equivalent at f/2.8 (actual focal length about 9 mm, pixel pitch about 1.1 µm). Even taking a strict circle of confusion of 2 pixels, the depth of field at 2 m spans roughly 1.7–2.4 m, so a few millimeters of object depth fit with room to spare. The Airy diameter (at ) is 3–4 pixels, so edges blur over a few pixels, but edge positions can still be read sub-pixel, consistent with the 0.5 px figure above. Also, of the “15x equivalent”, only 3x is optical; the rest is crop. Cropping only trims the field of view and does not change angular resolution, which is set by the pixel pitch and the blur just described.
Limitations
This is not a true telecentric measurement. It is only a pseudo-parallel projection: a central-projection lens whose perspective error has been pushed down to a practically negligible level by distance. The manual edge-point placement is also just an angle readout on a projected 2D image, not a measurement against CAD data or a calibrated metalworking fixture. So this method suits screening in situations where a telecentric lens is out of budget, but not final tolerance judgment or outgoing inspection, where metrology-grade accuracy is required.
Takeaway
Not owning the instrument is not a reason to give up on the measurement. Even without dedicated telecentric hardware, going back to optical first principles, i.e. buying distance with a telephoto lens, and nudging things toward a parallel projection with the phone in your pocket plus a small self-built assist tool, gets you taper-angle screening at usable accuracy. This is one instance, in the measurement domain, of the design approach Seimeido practices routinely: understand the principle and substitute what is on hand for the dedicated equipment.
Using smartphones this way is not a party trick. Apple itself uses the iPhone’s True Depth sensor and ambient light sensor as the measuring instrument in Apple TV’s Color Balance feature, measuring the light actually emitted by your TV screen. The manufacturer is repurposing the phone, a bundle of individually factory-calibrated sensors, as an optical instrument.
Going further back: at a CanSat competition I entered as a student (teams build a mock satellite the size of a beverage can), another school mounted an Android phone on their airframe as the flight computer. No other device packs a full sensor suite and a capable processor into something that compact and that cheap. This taper measurement is just one application of that, and there is plenty more I want to try along the same line.